Configuring the administrator account
When Exclaimer Signature Manager Office 365 Edition is first installed and set up, you are required to enter an administrator account. This account has impersonation rights for everyone in the organization, so all Office 365 mailboxes can be accessed. Everything you need to do is handled when you complete the installation process however, if you need to change this account for any reason in future, you should:
-
Specify new account credentials in Exclaimer Signature Manager Office 365 Edition
-
Run a PowerShell script to grant required permissions for this account
Specifying a new administrator account
-
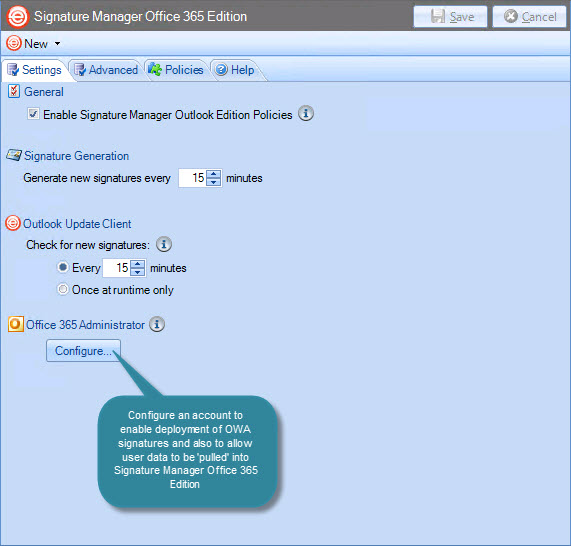
Within the Exclaimer console, select the Signature Manager Office 365 branch of the console tree.
-
In the content pane, select the settings tab:

-
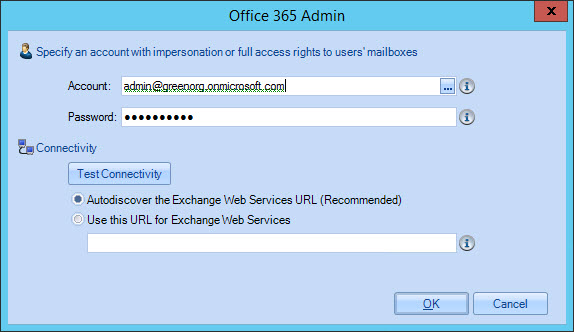
Click the configure button for Office 365 Administrator. Configuration options are displayed:

-
Configure server updates using the table below as a guide:
Option
Summary
Specify an account with impersonation or full access rights...
Exclaimer Signature Manager Office 365 Edition needs authority to access Office 365 mailboxes for all users - this is known as impersonation. The account configured here will be used to run the Exclaimer Signature Manager Office 365 Edition service which has impersonation rights for everyone in the organization, so all mailboxes can be accessed. The account specified here must:
- Be a Global Admin account
- Have a mailbox
- Have logged into OWA at least once
Connectivity
Autodiscover the Exchange Web Services URL (recommended)
The Exchange Web Services URL tells the system where to find required Office 365 data. On a correctly configured system, this URL is easily found using autodiscover (a Microsoft technology). However, for particularly complex or incorrectly configured systems, autodiscover may not work and so details must be entered manually.
Use this URL for Exchange Web Services
If the autodiscover option fails to detect the correct URL for Exchange Web Services, select this radio button and enter the required URL in the associated field.
-
Click OK to confirm any changes and exit back to the settings tab.
-
Click save to save all changes.
Running a PowerShell script to grant permissions
-
Open Windows PowerShell.
-
Enter the following command to connect to Office 365:
Import-PSSession (New-PSSession -ConfigurationName Microsoft.Exchange -Credential $null -ConnectionURI https://ps.outlook.com/powershell -Authentication Basic -AllowRedirection) -AllowClobber
-
When prompted to enter credentials, type the email address and password for your Office 365 Administrator account.
-
Enter the following command to setup the required credentials, replacing <account name> with the user account that you wish to use:
New-ManagementRoleAssignment –Name:impersonationAssignmentName –Role:ApplicationImpersonation –User: "<account name>" -
Close the PowerShell window. The user account you wish to use now has required permissions.
If you receive an error reading: ”New-ManagementRoleAssignment is not recognized as the name of a cmdlet, function, script file, or operable program” please contact Exclaimer Support for assistance.
What exactly is the impersonation account used for?
The administrator account is used to pull the following details from Office 365, for use in Exclaimer Signature Manager Office 365 Edition:
-
A list of users
-
A list of groups
-
A list of group memberships
-
User data (i.e. data used to populate fields in signature templates)
Additionally:
-
When a user saves a new or updated template for Microsoft Outlook signatures, this account is used to push associated signature files, images and settings to their user directories in Office 365 (ready to be retrieved by the Outlook Signature Update Agent).
-
When signatures are generated for OWA, this account is used to upload them to Office 365, for immediate use.


