Storage - Security
Each store is associated with its own security permissions that are used to determine which users can access it (via. search options) and what level of access those users have.
By default when a store is created, the user creating the store has access to Everyone’s email messages. All other users have access to only their own messages. However, access permissions can be defined with as much or as little granularity as required - for example, you can grant specified users access to all messages in the store, just their own messages in the store, all messages for a specified Active Directory group (and/or group members), a specific email address, etc. (to see all options click here).
These permissions are defined on the security tab:
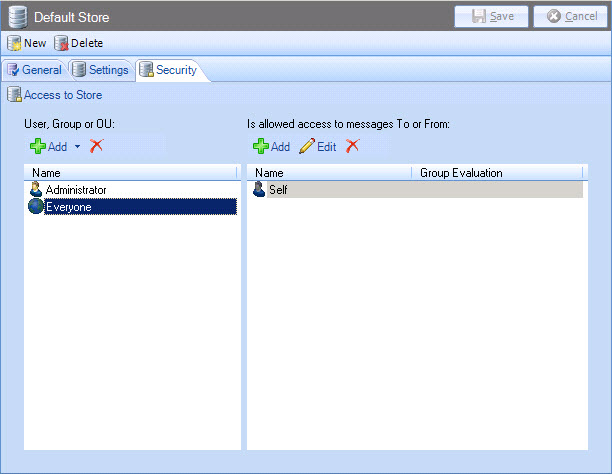
Here, users, groups or organizational units (OUs) are added in the left-hand pane and then their access permissions are added in the right-hand pane. If required, you can also edit or remove existing permissions.
|
An organizational unit is an Active Directory container into which users, groups, computers, and other organizational units can be placed. |
Adding a user, group, organizational unit or everyone
To add permissions for a store, you should first add the required user, group or organizational unit for whom permissions will be set. Alternatively, you can choose to add everyone. To do this, select the appropriate item from the add menu:
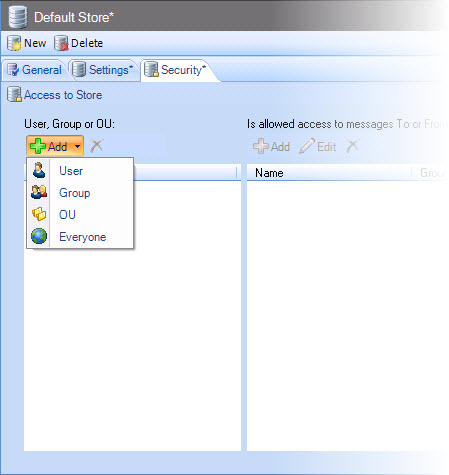
Selecting a user, a group or organizational unit will display a selection window. For example, choosing to add an OU displays the Active Directory Container window:
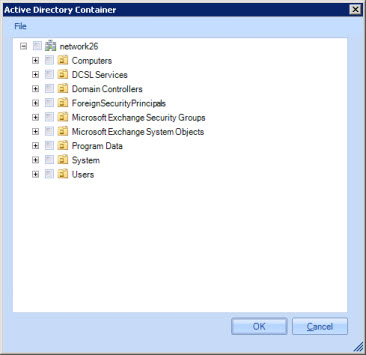
Simply navigate the selection window and select the required entry (choosing to add everyone simply adds this entry to the left-hand pane, without opening a selection window). Having added required users, groups and OUs, select each entry in turn and add required permissions.
Adding or updating access permissions
To set permissions for a user, a group or organizational unit (or for everyone), select the required entry in the left-hand pane; this activates options in the right-hand pane:
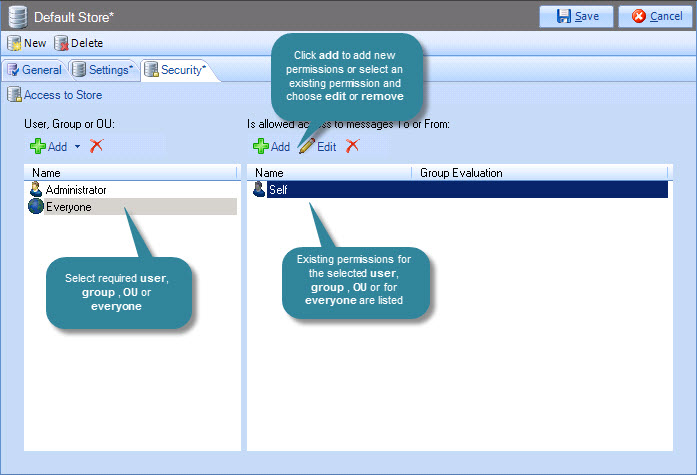
In some cases, suggested permissions are automatically added. For example, when everyone is added to the left-hand pane, default access permissions are set to self in the right-hand pane - i.e. everyone should have access to their own emails in the store.
To add permissions, click the add option (at the top of the right-hand pane) to open the store access permissions window and set required permissions for the selected entry:
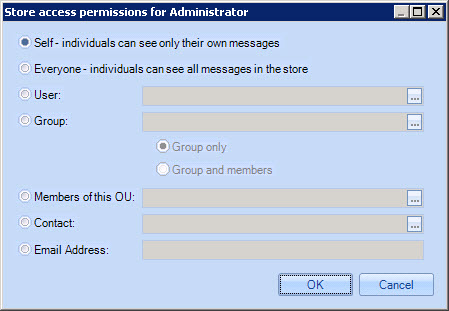
These options are summarized below:
|
The Selected User Will Have Access To... |
|
|
Self |
Only to their own email messages in this store. |
|
Everyone |
All email messages in this store. |
|
User |
Any email messages in this store sent or received by the selected Active Directory user (use the [...] button to browse and select the required user). |
|
Group |
Any email messages in this store sent or received by the group in the store. Choose from:
|
|
Members of this OU |
Any email messages in this store for members of the selected organizational unit (use the [...] button to browse and select the required organizational unit). |
|
Contact |
Any email messages for a specified contact - i.e. an external party who has been added to the Active Directory as a contact (for example, a supplier). |
|
Email Address |
Any email messages sent to or from a specified email address. |
Editing existing permissions
To edit permissions that have already been defined for a user, a group or organizational unit (or for everyone), select the required entry in the left-hand pane. Any existing permissions for the selected entry are displayed in the right-hand pane. From here, simply select the required permission and click the edit button (at the top of the right-hand pane) to open the store access permissions window and make required adjustments.
Note that any changes made do not take effect until the save option is chosen (at the top of the console). Alternatively choose cancel to abandon all changes.
Removing permissions
To remove permissions that have already been defined for a user, a group or organizational unit (or for everyone), select the required entry in the left-hand pane. Any existing permissions for the selected entry are displayed in the right-hand pane - simply select the required permission and click the delete icon (the red cross at the top of the right-hand pane).
Alternatively, you can entirely remove a user, a group, an organizational unit or an everyone entry. To do this, select the required entry in the left-hand panel and click the delete icon (the red cross at the top of the left-hand pane).


