Remote deployment
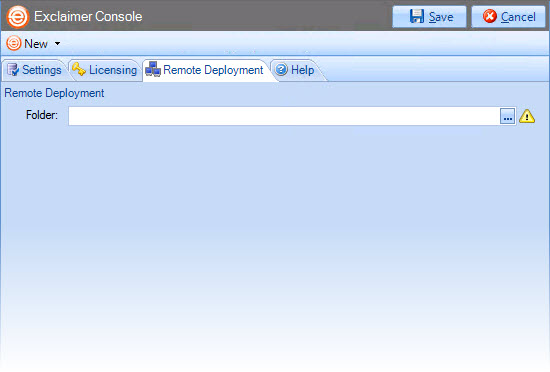
If you have multiple Exclaimer installations on your network (for example, you might have servers in different offices around the country), you can manage configuration in a single location and deploy this to all other servers. To do this, use the remote deployment tab to specify a shared location:

Then, whenever you save any changes to the configuration, you are asked to confirm if you would like to deploy them to other servers. If you opt to deploy changes, a file is written to the remote deployment folder and imported by the other installations.
|
Initially, Exclaimer software must be installed on each server - installation cannot be completed via remote deployment. Once installed, specify a remote deployment folder to manage subsequent configuration changes with remote deployment (each installation must have the same remote deployment folder). |
How it works
The remote deployment folder is defined using the remote deployment tab within the Exclaimer Console.
The specified folder must be a shared folder on the network (only one remote deployment folder should be used on an entire domain). When configuration changes are saved, the computer (on which those changes have been saved) pushes new configuration data to the remote deployment folder.
Remote machines receive notification from the operating system when new configuration data is detected in the shared folder, and they then pull (i.e. import) that data into their local installation. Push and pull operations are completed via the Exclaimer Signature Manager Outlook Edition Remote Deployment service.
The remote deployment folder
Create a shared folder on your network that will be accessible by all machines that are running Exclaimer Signature Manager Outlook Edition.
If you do not want the share to be visible to users, you should use a hidden share. This is done by adding a dollar ($) symbol to the end of the share name. Hidden shares cannot be viewed when browsing the network with Explorer, for example.
You should ensure that the user who is logged into the Exclaimer console (that is saving data) has read and write access to this folder.
The following sections detail two methods of applying folder permissions. These are applicable for both the sharing and the NTFS Security permissions of the shared folder - i.e. you must make the same permission changes in both the sharing and security tabs of the folder’s properties dialog.
Folder permissions (easy method)
Allow the Everyone group to have Read permissions.
Folder permissions (secure method)
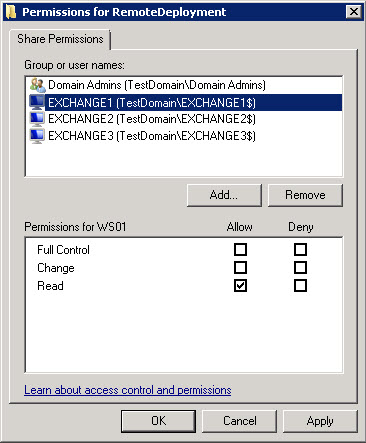
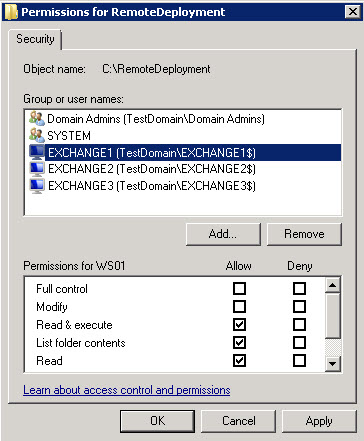
Allow Read permissions only for the computer account of each server with Exclaimer Signature Manager Outlook Edition installed upon it.
This is essential because the Exclaimer Signature Manager Outlook Edition Remote Deployment service runs under the LocalSystem account; this account (as the name suggests) only has access to the local system of the machine that it is running on - not to any network resources.
The only way this account can ever see a network resource is when the computer account is given specific access to that resource - i.e. the folder on the network resource allows itself to be accessed by the LocalSystem account of a specific remote machine. In this case, access is restricted to only reading data from the remote deployment folder.
Example permission settings are shown below:
|
Share Permissions |
Security Permissions |
Remote deployment timings
As soon as the Exclaimer Signature Manager Outlook Edition Remote Deployment service notices that there has been a change to the remote deployment folder, it starts a timer. Every ten seconds a check is made to see if the file has been written to in the last five seconds. If it has not, the file is added to a queue which will perform the actual import; otherwise the file remains in the timer list.
This means that the import should begin a maximum of ten seconds after the save finishes, though in practice it could be a little more than this depending on server load and how quickly the import thread is given control by the operating system. Similarly, the import could begin sooner, depending on when the save completes relative to the timer interval.
Before checking that configuration changes have been applied successfully on remote machines, sufficient time should be allowed for those machines to actually perform the import (the import can take some time with complex configurations).
Changing an existing remote deployment folder
If all Signature Manager Outlook Edition installations are set to point to a specific remote deployment folder and you later decide to change that folder, there is no need to manually change every server to point to the new location.
Having changed the location on one machine and saved the configuration, that machine will write a copy of the configuration data to both the old AND the new locations. Any servers pointing to the old location will import the configuration which includes the new remote deployment folder path so, on subsequent deployments, they will pull data from the new location.
As such, you are advised NOT to delete the old remote deployment folder until enough time has elapsed for all remote machines to import the configuration file that contains the new folder location.


