How do I create my first signature for Microsoft Outlook?
If you are setting up a signature policy for the first time, a good place to start is with one of the professionally designed templates included with Exclaimer Signature Manager Office 365 Edition.
These signatures contain fields which pull information (such as name, company, office, department, etc.) from Office 365 (or an On-Premises Active Directory, if configured). The following process shows how this can be achieved:
-
Select the signature policies branch in the console tree.
-
Click the new button from the toolbar to start the new Outlook signature policy wizard.
-
On the general window, specify a meaningful name for the policy - for example 'Standard Signature for All Users'.
-
Click next to progress with the wizard and choose a signature template. A range of templates are provided but you can also create your own in the template library.
-
Click next to see a preview of how the selected template will appear in email messages.
-
Click next to continue and set conditions under which this policy will be applied. In this case we want the signature to be applied to all users, therefore select the all Office 365 users option.
-
Click next and then finish to complete the wizard. The new policy is added to the signature policies branch of the console tree and is selected by default.
-
Select the options tab.
-
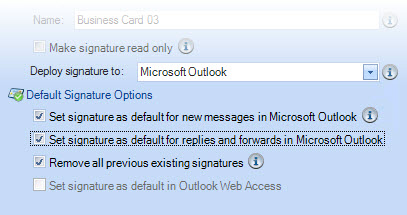
Ensure that deploy signature to is set to Microsoft Outlook:

-
Under default signature options, choose to set signature as default for new messages in Microsoft Outlook and set signature as default for replies and forwards in Microsoft Outlook:

-
Once you have saved changes, the policy is ready for use. It is a good idea to test the policy in the policy tester to ensure that it works as expected.
For more detailed information about adding policies, see the adding a new Outlook signature policy topic.


