Installing the client-side Outlook add-in via a logon script
This method of deployment is useful if you already have a logon script, or if you wish to deploy the Outlook add-in installer to a select number of users for test purposes. For clarity, this process has been documented in three stages:
Stage 1: Create new or update existing logon.bat
If you do not already have a logon.bat file, you should create one now. To do this:
-
Open Windows Notepad.
-
Create a file named logon.bat.
-
Enter the full UNC path to the Outlook add-in installer file, for example: \\Server\Share\Exclaimer.EmailAliasManager.OutlookAddIn.msi.
-
Save the logon.bat file.
-
Copy the logon.bat file to your shared NETLOGON folder.
|
If you already have a logon.bat file, simply add the full UNC path to the Outlook add-in installer file to it (for example: \\Server\Share\Exclaimer.EmailAliasManager.OutlookAddIn.msi) and save it to your shared NETLOGON folder. |
Stage 2: Set logon.bat as the logon script for required users
If required, you can set logon.bat as the login script for each Active Directory user. To do this:
-
Open Microsoft's Active Directory management tool, Active Directory Users and Computers.
-
Locate the required user (in the directory structure).
-
Double-click the user name, or right-click and select properties:

-
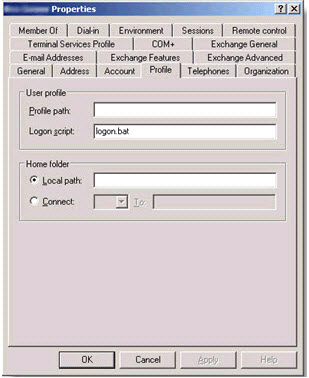
Select the appropriate tab, in this case profile.
-
Enter logon.bat into the logon script attribute and click OK.
Stage 3: Ask users to log out and log back in
Ensure that your users log off and log back on at least once to activate the new login script.


